
How to Download Video, Create Cut Ups, and Analyze with Hudl Technique
I have to give Todd Greenwell credit for inspiring me to write this post. I saw some great analysis/breakdown he was posting and asked him to explain how he was getting his video, trimming it, and analyzing it both with telestrations and voice over. He explained what he did and I began looking in to easy ways to download videos from YouTube as well as trim them down into smaller clips.
Below is a screen recording I did that shows you step by step
- how to download a youtube video you want
- how to trim the clip into the individual plays you want
Using HUDL TECHNIQUE for further analysis
The newest thing I have started using this off season is Hudl Technique. It is a mobile app that Hudl offers (was another slow mo recording app that Hudl bought out). I have been using it this off season to film kids in the weight room, and break down in slow motion their lifts to help them improve their form.
Coach Greenwell recently opened my eyes to the film analysis possible with Hudl Technique. Once you have the clip(s) you want you can load them to your iPad/mobile device camera. You can do this through the computer or I sent my plays from my MacBook to my iPad using AirDrop.
Once you have the video you want on your device (in my case my iPad) open the Hudl Technique app.
- Click Record
- Click Import
- Select the video you want to analyze
- It will appear in your videos. Now simply click play on the clip and it will go to full screen.
From here you will have the ability to draw on the video using different drawing tools, and at the top of the screen you will see a microphone icon. In the pic below you will see a screen shot of this exact part. A red arrow points out the microphone icon, a yellow arrow points out the drawing tools (if drawing tools do not appear click the pencil icon and they will appear).
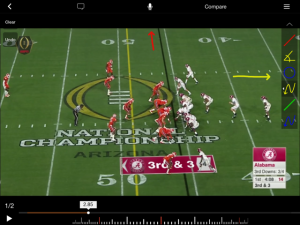
Now you can really get in depth and not just analyze a play in slow motion (varying speed control in bottom left corner of playback screen) but you can draw in different colors over the top of your video using the drawing tools. If you want to share your work with others (your staff, coaching friends, your players, or write for a blog like myself) you will hit the microphone icon on top. Pressing this microphone icon will began a screen recording that will also pick up audio. Now you can provide voice over as you go through the clip at whatever speed you want, adding in whatever drawing you want, and replaying it as many times as you want. Once you are done, press the microphone again to stop the recording and you have a new video saved that you can export to share in any way you like.
This is a great way for coaches to integrate technology into their teaching.
You can now easily create video teaching tools for your players/staff with your audio/feedback over the video plus the ability to annotate on screen. This is great for drawing blocking schemes, coverages, and highlight players to read on runs, passes, and RPOs.
![]()